“It’s the starfall, new stars are coming.”


Construction Notes:
The Star Guardian skins hit the internet and with it millions of us fell in love with these skins that paid homage to our anime loving roots. Even I, who had been away from the LoL community and game for years was intrigued enough by the designs and promise of a team enough to say yes when Missyeru approached Jinglebooboo and I to be apart of her group she wanted to do. I’m always a sucker for bright greens so my first choice was to join them as Lulu. I started drafting and compiling my resources for Lulu at the beginning of November 2016. I had a good amount patterned before I jumped into my 30 Day Fanime Countdown. Since the costumes are meant to be uniform, Missyeru, Jingle and I were always in very tight communication with each other! We planned trips to go get fabric and show off the techniques we were using.
Quick Jumps:
•Wig
•White Dress
•White Dress Bias
•Skirt
•Gloves + Shoes
•Bows
•3D Printed Parts


I combined Arda Wig’s Jareth Long into their Le Tigre in Light Green (CL-049). This time I used the method of attaching the new wefts to the wig with fabric glue and pins. I think this reall helped me time wise and it stood up to a lot of teasing. In the end the wig alone weighed 2 lbs. I tried to follow Hee-Hee’s Inuyasha wig tutorial for this, but deviated a bit due to time and skill restraints. I teased the inner wefts and laid out the clean fibers on top. I cut and tipped my bangs with Tub ‘n Tile to keep their shape. I glued on wefts to a set of felt ears I made. They’re hand sewn into the wig.


The white dress pattern started as Yaya Han’s M7373 as the base. It has all the right seams and a high neckline. I drew out the scalloped edges and cut them, keeping in mind the length of my skirt underneath. I modified the collar to be half scallops and free handed the box pleated puff sleeve on the first go! Once the pattern was finalized, I transferred it to my lining fabric, which is a lightly ribbed polyester in white – more leftover fabric from my wedding dress! Fun fact, all of our SG dresses have some amount of this fabric in them, which is fitting as Missyeru and Jingle were my bridesmaids ❤ The lining has boning channels on each seam below the bust and around the waist. I like to use single fold bias tape and spiral steel boning I cap with hot glue. The same pattern was used for my final fashion fabric, which is a thick matte spandex from the LA Fabric district.


We all cut our own bias tape out of 4 Way Stretch Vinyl in Shiny Gold from Spandex World. I attached the lining to the final fabric, just straight stitching with the edges raw, as they’d get covered by the bias tape anyway, no need to add bulk. I attached the gold bias around each edge and used my teflon foot to make it easier. I stitched in the ditch for a clean finish on the trim. After that I hand sewed in the front diamond, which is lined as well. An invisible zipper was put up the back.


The first skirt I sewed for Lulu, and the one I wore to con, I no longer like. I ended up redoing the skirt in a fabric I was more happy with. I used 1 yard of 60 inch green poly-satin from the LA Fabric District (I think I got it from Mond Tex), 1 invisible zipper, 1 metal snap, and Stitch Witchery. You can see the math in my photos that I used to figure out what to cut out of my available fabric, how big my pleats would be, etc. It looks like more work and math than it actually was. Last skirt had 6 box pleats, this time I went with 8. I also increased the length by 2 inches from the last one. I decided to serge the edges of all my cut pieces before sewing. I then sewed the 2 rectangle pieces together to make 1 long rectangle. I ironed the seam open after sewing 1/4 inch seam allowance. I hemmed it with Stitch Witchery (fusible bonding web), at about 3/4 inch. I used the hottest setting on the iron and a damp cloth to steam set it. I marked out my pleats at 3 3/4 inch. Folded them and pressed with an iron. Ran a loose machine stitch along the top in the serge to keep them in place for the waistband. I hand basted in the invisible zipper in before sewing it in. With the zipper fully sewn in, I then sewed up that seam to a little past the zipper end to create a clean zipper. Clip off the excess zipper. I sewed the waistband to the skirt, right sides facing at 1/4 inch seal allowance. Ironed up and in half so it was 1 1/4 in folded height, then stitched in the ditch. Stitch Witch-ed the end caps on the waistband. Zipped it up, marked the overlap and sewed in a snap. I ironed the pleats out at angles and not parallel so it’ll fit with the petticoat. My skirt closure is also much neater.


The base shoes are pointed toe wedges purchased off amazon. I wrapped my foot in plastic wrap and tape to mark out my shoe pattern. I went with a seam up the front and down the back. The shoe covers are made out of just the matte stretch spandex, with fusible interfacing from the ankle up to keep it up. The front and back seams are just straight stitches that I trimmed the seam allowance super close on. The bottom seam is top stitched and attached to the base shoe with E600. The top is trimmed with gold bias like the dress. Made a pair of gloves by tracing my hand onto card stock, cutting that out and sewing around the edges with 2 layers of my spandex together. I trim it up after I test that my hand can fit in it, keeping the cuts super close to the seams. Just like the shoes, it’s trimmed in gold and has fusible interfacing to keep its structure.
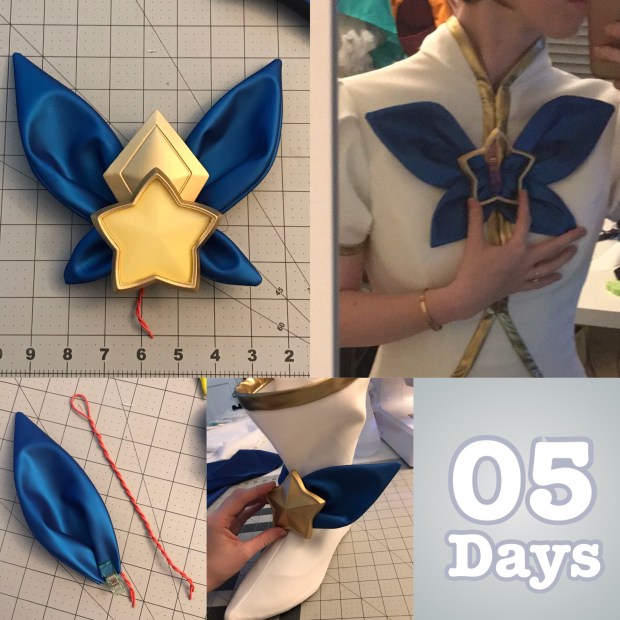
The bows are made of Yaya Han’s 4-Way Ultrapreme Fabric in Navy Blue. I love the little bit of sheen they have and the thickness of the fabric means I didn’t have to interface anything. I did add twisted bits of wire to help the very tips stay up on my crown bows and make them a bit more posable. They are sewn with 1 box pleat each, and depending on the placement their either hand sewn to the shoe or dress or glued to the crown.


All of the stars and the crown and staff were made by Toggle Photography! He made the models in Autodesk Maya and printed them on Aang, our FormLabs Form 1+ in clear resin. The chest star and head star are colored with Design Master’s TintIT in Sunflower, which lets light still travel through them. There is just a bit of batting and a backing in cardstock to hide the back connections. We used Desgin Master 14K Gold for the paint. The crown attaches to the wig with buckles. I sewed one side into the wig and glued the other to the back of the crown.
The staff was printed on a PLA printer we outsourced as we didn’t have one at the time. It’s glued together with super glue, covered in bodno and sanded down to a smooth finish. Toggle painted it quickly for me before Fanime.
